Summary: Dates: Sunday, May 18 - Thursday, May 22, 2008 Trailhead: "Upper Death Access" on Hells Backbone Road Exit: via the Boulder Mail Trail (BMT) to Escalante, UT Photos: Picasa Album, Terrain Map (with pictures)
Travel Day
We landed in Las Vegas around 11am on direct flight from Pittsburgh, rented a car, and stopped by REI. The weather was hot, and the forecast said it was likely to stay hot. After to talking to someone at the BLM office at Escalante and Mark from UtahCanyons.com, we decided to abandon our original itinerary, which would have involved a lot of walking in hot, open country, and instead head for Death Hollow. We'd originally considered that route, but earlier had dismissed it as likely to be too cold and full of water from spring runoff. And it sounded a bit intense in the guidebook:
But so far the spring rains had avoided the Escalante area, and so we looked to have a lucky weather window: hot weather before the water levels had a chance to rise. We provisioned food at an Albertsons in St. George, UT, and bought toy inflatable innertubes at Wal-Mart to float our packs. The best deal on rental wetsuits we found was from Zion Rock & Mountain Guides; they only charged us for the 5 days we used them (rather than the 7 days we had them), but the rentals still cost almost $200 (more than our rental car for the whole trip!).
From Zion we headed east past Bryce Canyon, finally stopping to sleep maybe 30 miles west of Escalante, parked off a dirt road near some kind of irrigation pond.
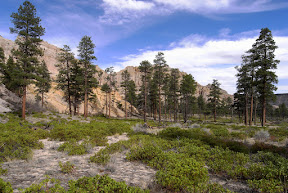
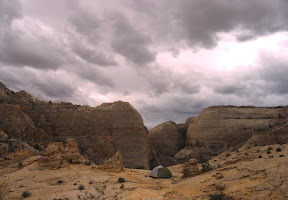
Day one We rolled into Escalante around 9am, feeling remarkably well rested. We first stopped by the Utah Canyons store to chat with Mark and buy a few things: 60L SealLine drybags (useful review), poison ivy block, and an annotated map. After getting a great cinnamon roll and coffee at Escalante Outfitters, we drove the 20 or so miles (about an hour) up Hells Backbone Road to the trailhead (marked by a small pullout on the left and a large information board labeled "Upper Death Access"). We made final gear decisions, packed our backpacks, and hit the trail around noon. Well, there isn't really a trail, but a decent use path leads down the steep ravine. After 30 minutes of scrambling we reached a dry stream bed, the waterless headwaters of Death Hollow. After following this for a ways, the angle eases and the stream bed begins to meander. The canyon widens into a broad rolling plateau, and we favored the more-direct left (east) edge, climbing or descending occasional slopes and crossing side drainages in an effort to stay on relatively flat benches. Pine trees, prickly pear, small bushes, and dry grass predominate, making for hot and dusty walking, but not bad as off-trail travel goes.
 Eventually the basin narrows again, near several large sandstone domes (ancient dunes frozen in time?), and the channel of Death Hollow swings back to the western slope and enters a short section of narrows. We weren't sure these were on the main channel initially, and so bypassed them via slopes on the right. After this section, the canyon opens slightly again, revealing a short cliff band on the left that guards a hanging bench. A rust-colored water stain on the cliff points to a grassy area containing a pool. The spring wasn't flowing, but we found somewhat putrid water in the pool at the base of the streak, and better water and an excellent slick-rock campsite on the bench above (a quick 4th class scramble is required). We started getting water and setting up camp around 6:30pm, after about 6 and half hours of total hiking time … not bad at all for 11 off-trail miles. We enjoyed a delicious meal made from pre-broken quick-cooking angel-hair pasta, one pack instant cheese (Annie's brand), 1/3C strong re-hydrated cold milk, one large foil pack of tuna packed in oil. We watched the moon rise as we ate.
Day two We expected cool shaded narrows with plenty of swimming in the coming section, and so opted for a lazy start. Before breakfast, I hiked up the bench with the cameras, eventually scrambling to the summit of a broad sandstone formation just south of our camp --- excellent views in many directions, exploring in this area is recommended. I re-joined Amy in camp, and we enjoyed a leisurely breakfast (instant coffee mixed with hot chocolate, and instant oatmeal fortified with powdered milk and a little instant cream of wheat, topped with dried fruit, nuts, and a few M&Ms). We started down canyon around 11am, only carrying a couple liters of water each as we expected to find more relatively quickly.
The route proved hotter and drier than expected. Even in the narrower sections the high hot sun usually pierced to the canyon floor. We down-climbed or lowered packs past several chockstones; I took a short falling swing into the canyon wall while on rappel (failure to appreciate how easily the webbing could slide along a polished chockstone), but otherwise the scrambling was mishap-free . Soon after we donned wetsuits for a 20-30 foot swim. Expecting more swimming, we hiked in the wetsuit bottoms for another 20 minutes before stripping them off. In retrospect we didn't need them at all this day, the water was warm enough and the air was hot (highs in the 90s?). After the first section of narrows, we took a longish (1/2 mile?) cairn-marked bypass trail on left (eastern) edge of the canyon.
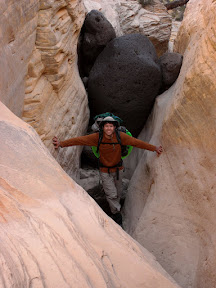 This skips some additional technical chockstone drops and maybe some swims, substituting bench walking --- still, the canyon it bypassed looked pretty, and if doing the route again in hot weather I'd consider staying in the canyon for this section. A few scrubby trees provided the only shade on the bypass, and while the use trail was initially clear, it become muddled in the vicinity of several small drainages that empty (over cliffs) into the main canyon. After a bit of scouting we continued on a bit farther and found a descent back into the main canyon. A much shorter bypass (maybe 150 yards) on lower and initially exposed ledges took us around a (double?) chockstone, bringing us to the confluence with the Right Fork of Death Hollow at about 4:45pm.
Earlier in the day, I'd taken some weight from Amy's pack since her knee was bothering her, and by this time heat, exertion, and dehydration had gotten to me. Descending the chockstones, changing in and out of the wetsuits, and rigging our packs for flotation had taken more time than expected as well. We found reasonably clear water in a pothole just up the right fork, and despite having hoped to get farther, decided to make camp and recover before continuing the technical narrows. It took me a few hours to start feeling myself again, I think I may have had some mild heat exhaustion. But by the time the sun was setting, the shade, rest, and water had me feeling much better.
For dinner, we started with Alpine Aire "Wild Tyme Turkey." To save weight and volume we had removed it from its foil bag and packed it in a light ziplock sandwich bag; we rehydrated/cooked it in one of our bowls, which worked well (my hat served as a good pot cozy while it sat rehydrating). In the other bowl we prepared some instant potatoes I'd pre-mixed with garlic, salt, and spices. We had been hoping to mix up some concentrated onion soup to use as a kind of sauce on our bagels for the next day. This idea did not work, it didn't thicken up at all, so we added it to the potatoes. This produced potatoes with way way too much salt. We had some, and saved the rest to use on the sandwiches the next day. That worked okay.
Day 3 Not wishing to repeat the previous days miscalculations, we got an earlier start, filtered a full supply of water (3.5L for me, 2.5L for Amy), and carefully packed and rigged our bags for flotation and easy lowering. I was comfortable down-climbing all of the chockstones in the next sections un-roped, and none dropped directly into water (though we did have a few swims). We made good time, never donning the wetsuits, and efficiently descending the obstacles.
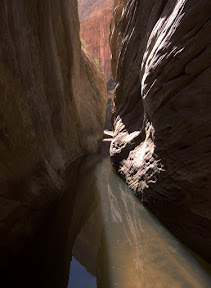 We reached beaver-cut small trees and continuous (perennial?) water flow after 2 or 3 hours. Deep pools and channels were common, often requiring pack flotation and either full-on swimming or delicate stemming on slick submerged rock. We progressed steadily, but in retrospect not particularly fast – finding the best routes through or around the pools sometimes required backtracking or at the very least careful footwork in the dark waters. The truly awesome beauty of this remote canyon demanded frequent photographs, and so I spent a lot of time retrieving and then stowing the large camera in our small drybag (it barely fit). The steep and narrow canyon walls revealed beautiful new vistas continually; the canyon rarely went more than 100 yards without a bend that revealed new views.
I don't think my photos can do this canyon justice --- the soaring multi-colored walls, vibrant green spring foliage, peaceful flowing water, and complete feeling of solitude make it unlike any canyon I've visited before. But that tranquil and meditative solitude carries with it a somber undertone. The terrain surrounding us was unforgiving as well as awe-inspiring, and being several days journey from any assured human contact or even communication carries with it risks not usually faced in everyday life. The rewards of descending such a canyon for me far outweigh the risks, but I have too much too live for to make it a stress-free enterprise.
As the day stretched on, clouds began to supplement the shade provided by the canyon walls, and a strong cool wind began to blow. At a short stop on a sandbar, I realized in a moment of panic that the small yellow drybag was gone ... I had attached it to my pack with some loose bungees hoping to make accessing it less cumbersome, and had failed to clip it in to a backup attachment. Stupid mistake. I did some swearing. Fortunately the cameras weren't in the bag, but it contained our lunch and my bag of small important items (headlamp, compass, knife, first aid items, etc). It had been at least a half-hour since I'd seen the bag. Amy pointed out I could still go back and try to find it, something that hadn't immediately occurred to me for some reason. I headed back up the canyon. Moving without my heavy pack, on known terrain, and with the motivation of self-directed anger, I backtracked in 10 minutes ground that had probably taken us 45 minutes to cover initially; I found the yellow drybag floating happily in a deep pool near an overhanging tree that had probably clawed it from the top of my backpack. Breathing a sigh of relief, I grabbed the bag and headed back down canyon.
I'd splashed through some deep pools in the retrieval effort, and the constant transitions from cold water to the now windy and overcast canyon had left me shivering noticeably (though not uncontrollably). We both put on our wetsuits and enjoyed a lunch of bagel sandwiches and gorp before undertaking a long (100 yard?) windy swim down canyon. With the wetsuit on, I warmed up fairly quickly.
After the beaver dams and perennial water flow, the next landmark mentioned in the guidebook was Sulpher Spring. But the guide's description was purely olfactory, and the distinctive smell never emerged. Normally I check my map regularly or at least have a good intuition about how far and fast I have traveled; the lack of any route-finding decisions made frequent map checks unnecessary, and I neglected them; the unfamiliar terrain with constantly changing features and widely varying travel speeds made tracking distances difficult. By mid-afternoon we realized it would be quite nice to know where we were in order to start planning a camp, but by this point we had no good idea how far we had come, and the limited features visible from the canyon floor made matching our location to the map difficult. We started tracking turns in the river and looking for landmarks, but came to no useful conclusions. Around 6:30pm we found a relatively unvegetated scramble up to a series of benches on the east side of the canyon. The lower bench had a floor of dirt and dried grass, but a short scramble higher brought us to a beautiful and flat slickrock campsite, maybe 100 feet above the river, offering great views and fine camping. We set up camp. The gusty wind unforuntanetly somewhat spoilled our dining experience. We made a burrito mix from a combination of instant black bean and tortillas soup, plus sausage and cheese. It would have been excellent, but fine blown sand made a less than desirable condiment.
While there was still light I climbed moderate slabs above the campsite to get a better view (you might be able to fully escape the canyon here with some low 5th class climbing), and then began to pour over the topo map. Before too long I had a good guess for our location; based on our presumed speed and travel time, earlier in the day we had guessed we had gone past Moonshadow canyon without correctly identifying it. But now I estimated that canyon joined Death Hollow another ¼ mile down river. This was a disappointing realization to have just before bed, considering how long and strenuous the day had felt, as well as the distinct sense that the weather was changing. We planned another early start with the anticipation of a long day.
Day 4 We had pumped enough water for dinner and breakfast before climbing to our camp the previous day, so our hydration bladders were empty as we set out.
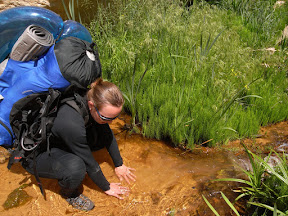 But being hydrated from breakfast and eager to confirm or reject my hypotheses as to our location, we opted to enjoy our light-weight packs and hike downstream for a while without water.
We traversed the benches on which we had camped, finding another convenient ramp down to the river at their southern end. This time I kept my compass out. By the end of the day, I was using the following technique to track our progress, and it seemed to be working well: rather than counting both left and right bends in the river, I'd look at the map and mentally note the general direction of the river as well as the number of "bumps" on a single side formed by bends over the next ¼ to 1 mile. I'd then make mental note of passing these points when we reached the apex of the corresponding curve. Once we reached the last one, I'd check the map, confirm our current location, and count the next sequence of bends to track.
After about 15-20 minutes of wading we reached the junction with Moonshadow canyon, clearly marked by a huge (200+ feet) live pine tree leaning against the left-hand wall of the canyon as you look up. A large darkly colored pool marks the confluence; brush choked the shoreline, with the exception of a large square rock platform that provided a convenient exit. We hiked up the canyon just far enough to be 100% sure it was Moonshadow. While the guidebook recommends exploring further, the sky was dark and the wind cold, and so we decided it would be prudent to continue down canyon quickly. At this point we began to frequently find good use trails that bypassed meanders of the river on dry land. We followed one of these along the left shore, past a large drainage entering from the east; we stopped to pump water at the point cliffs forced us back to the stream. A chilly wind and darkening clouds continued to threaten. We donned our full wetsuits preemptively and continued to wade down canyon, moving as quickly as was safely possibly --- the most treacherous sections were the shallower ones, where a 6 to 18 inches of water sometime covered jumbled stones and hidden branches. Before long I though I was feeling a few raindrops, and soon thereafter a light but distinct rain began, made unmistakable by the multitude of concentric ripples on the water.
It seemed clear that the light sprinkle would have little immediate impact on the flow of water in the canyon, but it suggested the distinct possibility that a harder rain had already been falling for some time higher in the drainage. Having no way of knowing how conditions would develop or the likelihood of a flash-flood, we began taking extra note of escapes to higher ground, which thankfully were plentiful at this point.
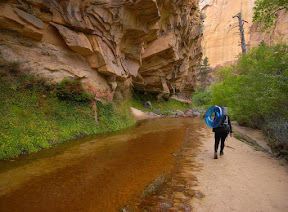 Easier terrain and the urgency imparted by the weather helped us make much better time than the previous day, and we reached the point the eastern segment of the Boulder Mail Trail (BMT) enters the canyon around 11:30am. Around this time we also started to see copious amounts of poison ivy along sections of the shoreline; on several occasions we chose to stay in the stream rather than taking trails overgrown with the stuff. A short time later we arrived at the steep ridge where the BMT climbs out of the canyon to head west to the town of Escalante. We had both decided at this point that we should return via the BMT rather than continuing down Death Hollow to the Escalante river; even if the water level did not rise, the colder temperatures and windy overcast conditions made continuing to wade and swim down-river seem less than appealing. We didn't see any good campsites along the river (though there may have been some a little frather down), so we climbed maybe 300 vertical feet up the BMT, where we found more excellent slickrock camping and outstanding views. After resting and snacking and setting up camp we took our hydration bladders, 3 Gatorade bottles, and our 1.3L cooking pot back down to the river to filter enough water for dinner and the next day's hike.
The rain had subsided by the time we reached the BMT, and we stayed dry in our camp, but we could see hard rains falling both to the north and the south of our camp, giving the distinct impression of being in the eye of a storm. A hard, cold wind picked up the powdery sand and depositing it in our tent, cameras, and anyplace else it could find a sheltered but open space.
We enjoyed our last camp dinner in the mid-afternoon: A "2 person" Richmoor Thai Chicken dish in one bowl, a side of spiced instant mashed potatoes (with powdered milk) in another (both supplemented with a tablespoon or so of olive oil --- it makes all the difference), and a Richmoor freeze-dried apple cobbler for dessert (surprisingly excellent). The sandy wind made staying out unattractive, so we climbed into the tent for an afternoon nap, emerging around 7pm to find beautiful light streaking in under the clouds, lighting up the canyon walls. We took a short walk to enjoy the views before retiring for the night.
Day 5 Temperatures dropped to their lowest levels of the trip that night (maybe down to the high 30s?), but we had both brought enough gear to stay warm. Once I got moving, the morning didn't feel to chilly. Storms and rain again swept the land in several directions, but we had no precipitation as we broke camp. Knowing we had a fairly straightforward 9 or so mile hike back to Escalante, but wanting to make sure we were moving before weather hit, we packed up camp efficiently if not hurriedly.
 We started the walk out in perfect hiking temperatures, maybe in the high 40s or low 50s. After climbing up slick-rock benches to the sandy juniper-covered plateau above, we were surprised by nothing less than a small flurry of snow; no accumulation, but distinctive flakes filtered down to dot the trees and our clothes before melting away --- what a contrast to the cloudless skies and oppressive 90 degree temperatures that had begun our trip.
We took several stops for pictures and a nice lunch above Antone flats, but otherwise moved fairly quickly. After descending towards Escalante we followed the trail along pine creek and then along the Escalante River to just before the trailhead, where we cut west to join the most direct road into town. We hiked straight to our hotel, the Prospector Inn (fine, though we might check out the just-renovated Circle-D next time), checked in, and then got a ride to retrieve our car from the trailhead --- I was concerned the rain and snow we had observed to the north might have made the gravel road impassable, but the retrieval mission went without incident, and we were back in town in time to shower and get pizza and beer at Escalante Outfitters.
Other Info and Links Online
Gear Notes: This isn't a complete list of what we brought, just some notes on items particularly relevant to this particular route in the conditions we found it.
Death Hollow, one of the most spectacular canons in southern Utah, should be on every hardcore canyoneer's tick list. The operative words here are death and hardcore; this canyon is difficult throughout and many epics have unfolded in its deepest recesses. [...] It is a canyon one aspires to, a reward for building skills and gaining experience over many seasons.
But so far the spring rains had avoided the Escalante area, and so we looked to have a lucky weather window: hot weather before the water levels had a chance to rise. We provisioned food at an Albertsons in St. George, UT, and bought toy inflatable innertubes at Wal-Mart to float our packs. The best deal on rental wetsuits we found was from Zion Rock & Mountain Guides; they only charged us for the 5 days we used them (rather than the 7 days we had them), but the rentals still cost almost $200 (more than our rental car for the whole trip!).
From Zion we headed east past Bryce Canyon, finally stopping to sleep maybe 30 miles west of Escalante, parked off a dirt road near some kind of irrigation pond.
Day one We rolled into Escalante around 9am, feeling remarkably well rested. We first stopped by the Utah Canyons store to chat with Mark and buy a few things: 60L SealLine drybags (useful review), poison ivy block, and an annotated map. After getting a great cinnamon roll and coffee at Escalante Outfitters, we drove the 20 or so miles (about an hour) up Hells Backbone Road to the trailhead (marked by a small pullout on the left and a large information board labeled "Upper Death Access"). We made final gear decisions, packed our backpacks, and hit the trail around noon. Well, there isn't really a trail, but a decent use path leads down the steep ravine. After 30 minutes of scrambling we reached a dry stream bed, the waterless headwaters of Death Hollow. After following this for a ways, the angle eases and the stream bed begins to meander. The canyon widens into a broad rolling plateau, and we favored the more-direct left (east) edge, climbing or descending occasional slopes and crossing side drainages in an effort to stay on relatively flat benches. Pine trees, prickly pear, small bushes, and dry grass predominate, making for hot and dusty walking, but not bad as off-trail travel goes.
Open benches on day one.
Day two We expected cool shaded narrows with plenty of swimming in the coming section, and so opted for a lazy start. Before breakfast, I hiked up the bench with the cameras, eventually scrambling to the summit of a broad sandstone formation just south of our camp --- excellent views in many directions, exploring in this area is recommended. I re-joined Amy in camp, and we enjoyed a leisurely breakfast (instant coffee mixed with hot chocolate, and instant oatmeal fortified with powdered milk and a little instant cream of wheat, topped with dried fruit, nuts, and a few M&Ms). We started down canyon around 11am, only carrying a couple liters of water each as we expected to find more relatively quickly.
The route proved hotter and drier than expected. Even in the narrower sections the high hot sun usually pierced to the canyon floor. We down-climbed or lowered packs past several chockstones; I took a short falling swing into the canyon wall while on rappel (failure to appreciate how easily the webbing could slide along a polished chockstone), but otherwise the scrambling was mishap-free . Soon after we donned wetsuits for a 20-30 foot swim. Expecting more swimming, we hiked in the wetsuit bottoms for another 20 minutes before stripping them off. In retrospect we didn't need them at all this day, the water was warm enough and the air was hot (highs in the 90s?). After the first section of narrows, we took a longish (1/2 mile?) cairn-marked bypass trail on left (eastern) edge of the canyon.
Brendan below several
volcanic chockstones.
Earlier in the day, I'd taken some weight from Amy's pack since her knee was bothering her, and by this time heat, exertion, and dehydration had gotten to me. Descending the chockstones, changing in and out of the wetsuits, and rigging our packs for flotation had taken more time than expected as well. We found reasonably clear water in a pothole just up the right fork, and despite having hoped to get farther, decided to make camp and recover before continuing the technical narrows. It took me a few hours to start feeling myself again, I think I may have had some mild heat exhaustion. But by the time the sun was setting, the shade, rest, and water had me feeling much better.
For dinner, we started with Alpine Aire "Wild Tyme Turkey." To save weight and volume we had removed it from its foil bag and packed it in a light ziplock sandwich bag; we rehydrated/cooked it in one of our bowls, which worked well (my hat served as a good pot cozy while it sat rehydrating). In the other bowl we prepared some instant potatoes I'd pre-mixed with garlic, salt, and spices. We had been hoping to mix up some concentrated onion soup to use as a kind of sauce on our bagels for the next day. This idea did not work, it didn't thicken up at all, so we added it to the potatoes. This produced potatoes with way way too much salt. We had some, and saved the rest to use on the sandwiches the next day. That worked okay.
Day 3 Not wishing to repeat the previous days miscalculations, we got an earlier start, filtered a full supply of water (3.5L for me, 2.5L for Amy), and carefully packed and rigged our bags for flotation and easy lowering. I was comfortable down-climbing all of the chockstones in the next sections un-roped, and none dropped directly into water (though we did have a few swims). We made good time, never donning the wetsuits, and efficiently descending the obstacles.
Narrows, day 3.
I don't think my photos can do this canyon justice --- the soaring multi-colored walls, vibrant green spring foliage, peaceful flowing water, and complete feeling of solitude make it unlike any canyon I've visited before. But that tranquil and meditative solitude carries with it a somber undertone. The terrain surrounding us was unforgiving as well as awe-inspiring, and being several days journey from any assured human contact or even communication carries with it risks not usually faced in everyday life. The rewards of descending such a canyon for me far outweigh the risks, but I have too much too live for to make it a stress-free enterprise.
As the day stretched on, clouds began to supplement the shade provided by the canyon walls, and a strong cool wind began to blow. At a short stop on a sandbar, I realized in a moment of panic that the small yellow drybag was gone ... I had attached it to my pack with some loose bungees hoping to make accessing it less cumbersome, and had failed to clip it in to a backup attachment. Stupid mistake. I did some swearing. Fortunately the cameras weren't in the bag, but it contained our lunch and my bag of small important items (headlamp, compass, knife, first aid items, etc). It had been at least a half-hour since I'd seen the bag. Amy pointed out I could still go back and try to find it, something that hadn't immediately occurred to me for some reason. I headed back up the canyon. Moving without my heavy pack, on known terrain, and with the motivation of self-directed anger, I backtracked in 10 minutes ground that had probably taken us 45 minutes to cover initially; I found the yellow drybag floating happily in a deep pool near an overhanging tree that had probably clawed it from the top of my backpack. Breathing a sigh of relief, I grabbed the bag and headed back down canyon.
I'd splashed through some deep pools in the retrieval effort, and the constant transitions from cold water to the now windy and overcast canyon had left me shivering noticeably (though not uncontrollably). We both put on our wetsuits and enjoyed a lunch of bagel sandwiches and gorp before undertaking a long (100 yard?) windy swim down canyon. With the wetsuit on, I warmed up fairly quickly.
After the beaver dams and perennial water flow, the next landmark mentioned in the guidebook was Sulpher Spring. But the guide's description was purely olfactory, and the distinctive smell never emerged. Normally I check my map regularly or at least have a good intuition about how far and fast I have traveled; the lack of any route-finding decisions made frequent map checks unnecessary, and I neglected them; the unfamiliar terrain with constantly changing features and widely varying travel speeds made tracking distances difficult. By mid-afternoon we realized it would be quite nice to know where we were in order to start planning a camp, but by this point we had no good idea how far we had come, and the limited features visible from the canyon floor made matching our location to the map difficult. We started tracking turns in the river and looking for landmarks, but came to no useful conclusions. Around 6:30pm we found a relatively unvegetated scramble up to a series of benches on the east side of the canyon. The lower bench had a floor of dirt and dried grass, but a short scramble higher brought us to a beautiful and flat slickrock campsite, maybe 100 feet above the river, offering great views and fine camping. We set up camp. The gusty wind unforuntanetly somewhat spoilled our dining experience. We made a burrito mix from a combination of instant black bean and tortillas soup, plus sausage and cheese. It would have been excellent, but fine blown sand made a less than desirable condiment.
While there was still light I climbed moderate slabs above the campsite to get a better view (you might be able to fully escape the canyon here with some low 5th class climbing), and then began to pour over the topo map. Before too long I had a good guess for our location; based on our presumed speed and travel time, earlier in the day we had guessed we had gone past Moonshadow canyon without correctly identifying it. But now I estimated that canyon joined Death Hollow another ¼ mile down river. This was a disappointing realization to have just before bed, considering how long and strenuous the day had felt, as well as the distinct sense that the weather was changing. We planned another early start with the anticipation of a long day.
Day 4 We had pumped enough water for dinner and breakfast before climbing to our camp the previous day, so our hydration bladders were empty as we set out.
Heavy pack, lush vegetation, cold water.
We traversed the benches on which we had camped, finding another convenient ramp down to the river at their southern end. This time I kept my compass out. By the end of the day, I was using the following technique to track our progress, and it seemed to be working well: rather than counting both left and right bends in the river, I'd look at the map and mentally note the general direction of the river as well as the number of "bumps" on a single side formed by bends over the next ¼ to 1 mile. I'd then make mental note of passing these points when we reached the apex of the corresponding curve. Once we reached the last one, I'd check the map, confirm our current location, and count the next sequence of bends to track.
After about 15-20 minutes of wading we reached the junction with Moonshadow canyon, clearly marked by a huge (200+ feet) live pine tree leaning against the left-hand wall of the canyon as you look up. A large darkly colored pool marks the confluence; brush choked the shoreline, with the exception of a large square rock platform that provided a convenient exit. We hiked up the canyon just far enough to be 100% sure it was Moonshadow. While the guidebook recommends exploring further, the sky was dark and the wind cold, and so we decided it would be prudent to continue down canyon quickly. At this point we began to frequently find good use trails that bypassed meanders of the river on dry land. We followed one of these along the left shore, past a large drainage entering from the east; we stopped to pump water at the point cliffs forced us back to the stream. A chilly wind and darkening clouds continued to threaten. We donned our full wetsuits preemptively and continued to wade down canyon, moving as quickly as was safely possibly --- the most treacherous sections were the shallower ones, where a 6 to 18 inches of water sometime covered jumbled stones and hidden branches. Before long I though I was feeling a few raindrops, and soon thereafter a light but distinct rain began, made unmistakable by the multitude of concentric ripples on the water.
It seemed clear that the light sprinkle would have little immediate impact on the flow of water in the canyon, but it suggested the distinct possibility that a harder rain had already been falling for some time higher in the drainage. Having no way of knowing how conditions would develop or the likelihood of a flash-flood, we began taking extra note of escapes to higher ground, which thankfully were plentiful at this point.
It doesn't get better than a stretch
of easy
walking in a beautiful canyon.
walking in a beautiful canyon.
The rain had subsided by the time we reached the BMT, and we stayed dry in our camp, but we could see hard rains falling both to the north and the south of our camp, giving the distinct impression of being in the eye of a storm. A hard, cold wind picked up the powdery sand and depositing it in our tent, cameras, and anyplace else it could find a sheltered but open space.
We enjoyed our last camp dinner in the mid-afternoon: A "2 person" Richmoor Thai Chicken dish in one bowl, a side of spiced instant mashed potatoes (with powdered milk) in another (both supplemented with a tablespoon or so of olive oil --- it makes all the difference), and a Richmoor freeze-dried apple cobbler for dessert (surprisingly excellent). The sandy wind made staying out unattractive, so we climbed into the tent for an afternoon nap, emerging around 7pm to find beautiful light streaking in under the clouds, lighting up the canyon walls. We took a short walk to enjoy the views before retiring for the night.
Day 5 Temperatures dropped to their lowest levels of the trip that night (maybe down to the high 30s?), but we had both brought enough gear to stay warm. Once I got moving, the morning didn't feel to chilly. Storms and rain again swept the land in several directions, but we had no precipitation as we broke camp. Knowing we had a fairly straightforward 9 or so mile hike back to Escalante, but wanting to make sure we were moving before weather hit, we packed up camp efficiently if not hurriedly.
Camp Four, above
Death Hollow on the BMT.
We took several stops for pictures and a nice lunch above Antone flats, but otherwise moved fairly quickly. After descending towards Escalante we followed the trail along pine creek and then along the Escalante River to just before the trailhead, where we cut west to join the most direct road into town. We hiked straight to our hotel, the Prospector Inn (fine, though we might check out the just-renovated Circle-D next time), checked in, and then got a ride to retrieve our car from the trailhead --- I was concerned the rain and snow we had observed to the north might have made the gravel road impassable, but the retrieval mission went without incident, and we were back in town in time to shower and get pizza and beer at Escalante Outfitters.
Other Info and Links Online
- Detailed Info and Some Pictures. From "Todd's Desert Hiking Guide."
- Trip Report (in German): Includes a few nice pictures.
- Another Trip Report. With pictures. From 2005.
Gear Notes: This isn't a complete list of what we brought, just some notes on items particularly relevant to this particular route in the conditions we found it.
- 65 feet of 1" tubular webbing: Great, but heavy when wet. Probably could have gotten by with no harnesses and only 30'. Webbing was great for hip belays and hand-over-handing, probably better than thin static line. We kept it tied off on top of my pack, with 45' left coiled, then tied off to the hall loop on my pack, then 20' accessible. Our system for descending moderate drops: Drop packs. I detach the 20' of webbing, and sit behind the chockstone, anchoring with a hip belay. Amy descends the chockstone with scrambling and/or hand-over-hand on the webbing (for the tougher sections we tied loops for better handholds). I pull the webbing, attach the free end to Amy's pack, then lower. She detaches, I pull webbing. Then lower my pack on the pre-tied knot and drop the free end of the rope. I would then down-climb the chockstone with a spot from Amy; if needed we would anchor a loop of the rope rappel-style so I could use it, then pull (but be careful of the constrictions where chockstones touch the canyon walls --- the will snag the webbing very easily.
- BD Shadow 55 pack: Barely big enough. Fabric suffers some abrasion and damage on lowers. Strap system worked well for attaching dry bag, sleeping pad, and wet suit on the outside.
- Wide-brimmed sunhat and sunglasses: Essential on the first couple of days and for the BMT. Sunscreen too. I probably could have used a bandanna or a shirt with more of a collar to get a little more neck protection, though I never got burned.
- $2 Wal-Mart inflatable innertube: Some form of pack flotation is essential, I wouldn't do this route without something like this. These were light and cheap ($2), and held up OK. Amy did put a hole in hers on day four, fortunately after our need for flotation had passed. Still, if I was going all the way to the Escalante it would probably have been good to have something a bit more robust --- otherwise extra care is needed around branches./li>
- old REI yellow vinyl dry bag: Heavy but reliable. Big camera (Canon 10D) in case barely fits, a pain to stuff in and out. Lost once, had to backtrack ¼ mile to retrieve --- always backup connections to stuff attached to the outside of the pack!
- 3/4 length Ridge Rest sleeping pad: Great: lightweight, excellent for added pack flotation, can suffer significant abuse and just keep working. Dried out quickly. Not particularly comfortable, I especially feel my hip bones when sleeping on my side on rock. Folding over the bottom to get double coverage under the hips helps some. The wetsuits also make a good supplemental pad once they had dried.
- Vargo Titanium 1.3L pot: Great. Really only boils about 1L or so of water at a time (maybe a bit more, but you risk spillage). But that's just enough for 2 bowls of oatmeal and 2 small hot drinks in the morning, or two dinner portions each requiring a couple of cups of boiling water.
- MSR Pocket Rocket stove: Used a single large (8oz) fuel canister. Probably only boiled about 9L or so of water, had plenty of fuel left. I used a stiff-foil windscreen and small stuff-sack to pack this, wrapping the windscreen tightly around the stove --- lighter than the supplied hard-plastic case. I was a bit worried about sand getting in the stove or the fuel canister connection, but were apparently careful enough to avoid any problems.
- Ziplock snap n' seal bowls: Hold about 3 cups if totally full, a good size for dinner portions, tight fistting lids make cleaning easy: add some water, attach lid, shake vigorously, drink, wipe clean. Tolerates boiling water well, we re-packaged our freeze-dried dinner into ziplock sandwich bags, and just rehydrated them in these bowls --- worked well. My warm hat plus the stove wind screen made a good pot cozy to keep these warm while cooking.
- REI Quarterdome 2p tent: Light, held up well to high winds. The full bug-netting upper tent body did let in some fine sand when the wind was up … a higher bathtub floor or a fly that reached closer to the ground would have been preferable in this situation. Length is just enough for me to sleep comfortably stretched out, but if it was really wet and I wanted to avoid touching the tent walls at the top and bottom I'd have to curl up a little bit.
- Wet suits: NRS 3mm Farmer John plus 3mm jacket. Probably not needed on this route in guaranteed hot weather when water is low. But on Wednesday, when the clouds came in, temperatures fell, and the wind was up we would have gotten very cold without them. If doing more canyons we'll probably just buy wetsuits, as you can probably buy a pair on sierratradingpost.com for about the price we rented them if you watch for a good deal.
- La Sportiva Exum River shoes: Approach-shoe style, sticky rubber, all synthetic materials (they don't stretch when wet), and good water drainage. I wore them all five days, and if doing it again wouldn't have brought the light-weight pair of auxillarly tennis shoes --- I'd planneed on using them for camp, and for hiking if the exum river's gave me blisters, but our camps were all on slickrock where going barefoot felt great (just watch for cactus on the perimiter!. These must run fairly small, as I am about an 11.5EE shoe size, and a size 13.5US fit me well. Here's a good comparison to 5.10s Canyoneer shoe.
- Thoughts on stuff we didn't bring: A tarp tent or other non-enclosed shelter would probably have been unpleasant in sandy windy areas. Trekking poles would be useful for some of the first day, and some of the less deep wading sections later in the trip, but would get in the way for the narrows and the more rugged scrambling. Suitable walking sticks were readily available, however, and we made use of them on the first day, and Amy used one on day four. Keeping the camera dry was either a pain or risky given our available systems --- a pelican-style plastic case affixed to the pack in a convenient location would be ideal for a small camera. I'm still not sure what the best system for protecting an SLR would be, but a dry bag that can easily contain the full kit would be a good start. For route finding, you usually only need a mile or so coverage from the topo map, so making laminated cards maybe 5"x7" with the relevant map sections and keeping them clipped close at hand would have worked very well. Having my compass on a lanyard would also have been nice (I would prefer a shirt with a Napoleon pocket, but didn't have one suitable for this trip).
- Thoughts on stuff we brought but didn't need: Bug juice – we saw a few mesqitos, but they weren't biting much and we never put on the DEET. Still, in other seasons/conditions the bugs might be worse. I probably could have skipped my light-weight synthetic jacket, substituting the wetsuit top if it got really cold … less comfortable, but would save 14oz or so. I brought convertible pants, but never ended up using them as shorts … the brush and scrambling and poison ivy made long pants the perfrable choice for almost the whole trip … if it had been warmer, shorts might have been nice for the hike out on the BMT. I brought 6 titanium and 2 alluminum tent statkes, but we only used one tent stake the whole trip, and that was to heat up and poke holes in the bottoms of our packs so they would drain water --- we anchored the tent on the slickrock with "snares" that held medium-sized rocks.